Patternistic
Humans inherently love to make patterns. To account for and validate their observations and conclusions. However, this is a creative hypothesis for another time.
Let us look at a subtle micro-interaction: patternistic — a small case study on how even the tiniest details matter.

A huge thank you to Harsh Kapadia for pushing me to document my thought process about this project. Shoutout to Aditya Oberai for convincing me to write a blog irrespective of the simplicity or complexity of the topic and asked me to convert short form content to long form content whenever feasible.
Context
I was playing around with animations the week before I built patternistic. During that period, I built Resonating Circles.
Here, I implemented raw animations, transitions and transformations with a little interactivity. This was highly an iterative process.
In the coming week, I saw a pattern on social media and I thought to build a tool that creates those patterns. However, patternistic is no where close to what I thought I had in mind. But certain beautiful experiences take place with no expectations in mind. So, here we go.
Patternistic
Users love to interact. Interaction is fundamentally a contiguous response or feedback on user interaction.
In Resonating Circles, the interaction was onClick. There is some friction on click.
Hereby, I chose to increase the level of interactivity, by responding to the user on onHover for a smoother interaction.
I decided to make some trailing patterns (low-key always wanted to do this) and here's the base code to create elements.
Ouptut:
A simple trailling pattern as we move the cursor around.
Now, this is exactly what I had in mind, but the mind wasn't satisified with this. Now, it looked vanilla and I wanted to do more.
Improvise
I thought I will move the particle "here and there". Yes, I could not describe what I wanted to do. I wanted to make it look random, but how do I specify this random.

I knew I wanted to keep it simple. Did not want to use JavaScript for this and wanted to keep it simple with The modern web's underrated powerhouse.
I thought about the basic two-dimensional movements: Translate and Scale. Hence, I decided to define the random.
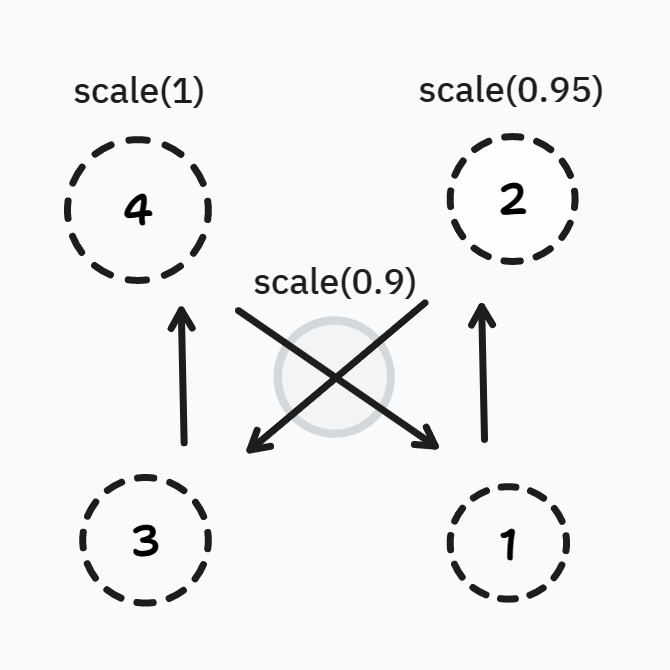
Hence, I added a simple animation and a keyframe split into 5 phases —
It would translate 4px (here and there) and scale from 0.9 to the original size in 2 seconds from the time of origin of the circle.
.item {
    position: absolute;
    animation: moveAround 2s ease-in-out infinite;
}

@keyframes moveAround {
    0% {
        transform: translate(4px, 4px);
        transform: scale(0.9);
    }
    25% {
        transform: translate(-4px, 4px);
    }
    50% {
        transform: translate(4px, -4px);
        transform: scale(0.95);
    }
    75% {
        transform: translate(-4px, -4px);
    }
    100% {
        transform: translate(4px, 4px);
        transform: scale(1);
    }
}
Note: Why ease-in-out? Find out more about easing functions.
Output:
Then, if we play around more, we could make it obvious and more energetic by extending our limits:
In short — reducing our total time window (to one second, in this case) and making our scaling up much more obvious.
.item {
    position: absolute;
    animation: moveAround 1s ease-in-out infinite;
}

@keyframes moveAround {
    0% {
        transform: translate(4px, 4px);
        transform: scale(0.8);
    }
    25% {
        transform: translate(-4px, 4px);
    }
    50% {
        transform: translate(4px, -4px);
        transform: scale(0.9);
    }
    75% {
        transform: translate(-4px, -4px);
    }
    100% {
        transform: translate(4px, 4px);
        transform: scale(1);
    }
}
Ouptut:
Adding a control panel
It was fun playing around with the code — Trying out different values and iterations.
I would want the user to play with them as well, therefore to ease the process — I added a control panel.
Thinking about the panel
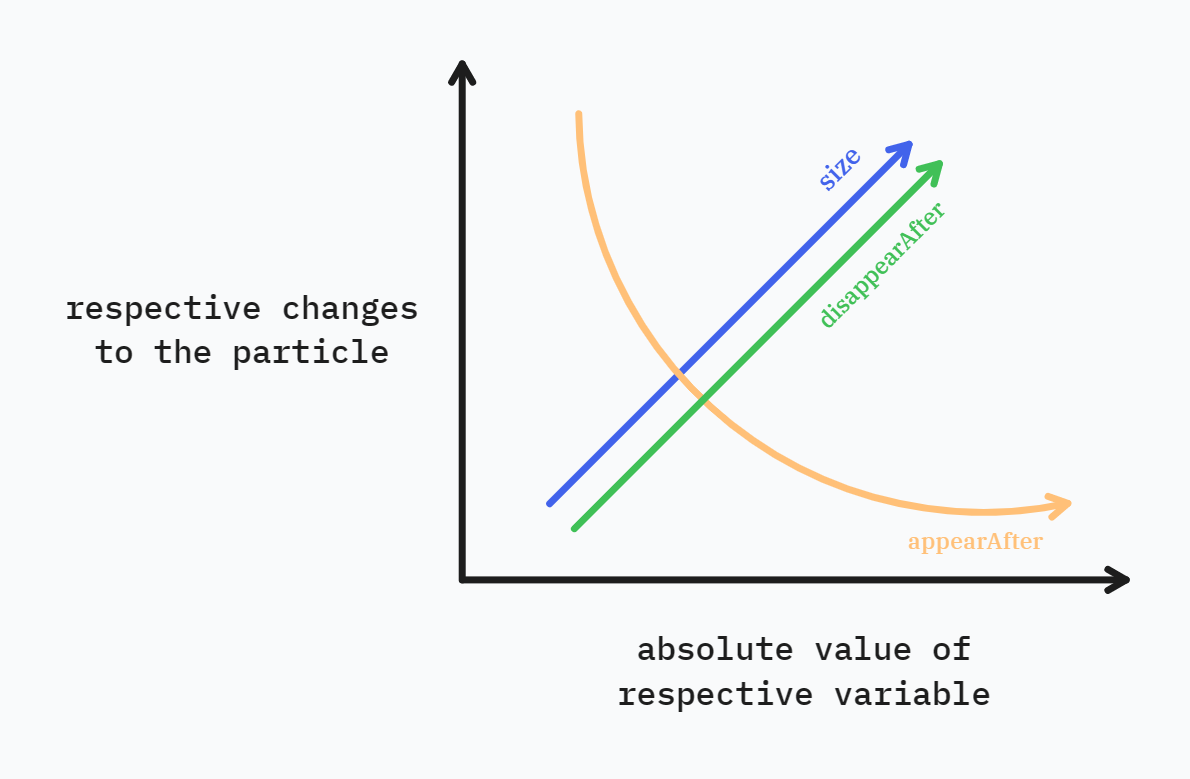
I had 3 straightforward variables in mind that I was continuously manipulating:
height/width: Size of the particledisappearAfter: The particles that were disappearing after certain amount of time.appearAfter: The particles that were created after a certain amount of time.
But why should disappearAfter and appearAfter be different? To have a trailing effect, we have to retain particles at their positions for a little longer.
Hence, we have: disappearAfter > appearAfter.
Simplifying these variables
Hopefully, these terms make sense to a developer. But how do I explain it to the user?
Hence, I thought about analogous descriptions and manipulated the variables accordingly.
Size: Equivalent to Height/Width (straightforward)
Trailing Length: Propotional to the disappearAfter; the longer the duration before removing the particle, the longer it is going to stay, the longer will be the trailing length.
Number of particles: Inversely proptional to the appearAfter. Let's take a closer look here. The number particles that are created every millisecond, would be more than the particles that are created every 100 milliseconds. Hence, it is inversely proportional to the absolute value of time.
Note: The proportionality/dispropotionate factor is taken to be linear. Did not give a lot of thought here.
Finally, I set moderate lower and upper bounds such that the effects do not go out of hand by the user. And now our control panel was ready to use.
Zooming Out
These experiments (or let's call them "case studies" to sound cool) were started with a blank canvas, with absolutely nothing but a broad topic or outline in mind. Rest was hit and trial.
Experimenting, rather exploring like a kid. An iterative procedure until you get content and satisfaction from what's infront of you. It was surprising yet extremely fulfilling. Like looking at someone learn how to walk.